Laptop Protector


Here the notebook anti theft protector circuit to secure your important netbook / notebook from stealing. Basically, this is a mini security alarm generator. Fixed inside the notebook case, it will definitely sound a noisy alarm when a person attempts to grab the notebook. This very sensitive circuit utilizes a homemade tilt switch to turn on the alarm system through tilting of the laptop computer case.

The circuit utilizes readily available parts and also can easily be constructed on a little piece of general-purpose PCB or a Vero board. This circuit is operated by a 12V miniature battery applied in remote control devices.
IC TLO71 (IC1) is utilized as a voltage comparator with a potential divider composed of R2 and R3 delivering fifty percent power supply voltage at the non-inverting input (pin 3) of IC1. The inverting input gets a higher voltage through a water-activated tilt switch only when the probes in the tilt switch make contact with water. When the tilt switch is maintained in the horizontal position, the inverting input of IC1 receives a higher voltage than its noninverting input and the output continues to be low.
The CD4538 (IC2) is utilized as a monostable multivibrator with timing factors R5 and C1. Considering the shown values, the output of IC2 continues to be low for a duration of three minutes. CD4538 is an accuracy monostable multivibrator free from incorrect triggering and also is much more reliable compared to the well-known timer IC 555. Its output comes to be high when power is turned on and it gets low when the trigger input (pin 5) receives a low to high transition pulse.
The circuit device is fixed inside the notebook case in horizontal position. In this position, water inside the tilt switch properly shorts the contacts, so the output of IC1 continues to be low. The alarm system generator stays silent in the standby mode as trigger pin 5 of IC2 is low. When a person attempts to grab the notebook case, the unit takes the vertical position and the tilt switch breaks the electrical contact between the probes. Instantly the output of IC1 comes to be high and monostable IC2 is triggered. The low output from IC2 triggers the PNP transistor (T1) and then the buzzer starts beeping.
Construct the circuit as compactly as feasible so as to make the unit matchbox dimension. Make the tilt switch working with a small (2.5 centimeters long and 1cm wide) plastic bottle with two stainless pins as contacts. Fill two-third of the bottle with water such that the contacts never make electrical path when the tilt switch is in vertical position. Make sure the bottle is leakproof with adhesive or wax.
Fix the tilt switch inside the enclosure of the circuit in horizontal position. Fit the unit inside the notebook case in horizontal position working with adhesive. Work with a miniature buzzer and a micro switch (S1) for making the device small and lightweight. Maintain the notebook case in horizontal position and turn on the circuit. Your notebook is right now secured.
Source

220V AC Lamp Touch Dimmer

Here the 220V AC lamp touch dimmer circuit. By only touching this touch dimmer you are able to increase the light intensity of incandescent lamps in three stages. The touch dimmer is designed all around 8-pin CMOS IC TT8486A/TT6061A especially produced for touch dimmer applications.
In the beginning, when mains switch is “on”, the lamp is “off”. Now, when you touch the touch plate, the lamp glows dimly. On second touch, the lamp provides medium light. At the third touch, the lamp is powered fully. One more touch puts off the light.
Considering that the IC is very sensitive, utilize a long wire to connect the IC towards the touch sensor. The circuit utilizes minimal external parts. For touch plate, it is possible to utilize a simple copper plate of 1cm×1cm or simply the end of the lead wire. Touch plate is joined together towards the touch detector via 820pF, 2kV capacitors C1, C2, and C3 coupled in series. Internally IC TT6061A’s touch signal is connected to the counter/decoder via a resistor and clock input CK is connected to the counter/decoder via a frequency generator.
Line frequency signal is obtained via R4 at pin 2 of IC TT6061A. At zero crossing, the triac (BT136) triggers to drive a 200W lamp.
The 6.8V power supply is obtained straight from mains through resistors R1 and R3, diode D3, capacitor C4, and zener diode and given to power input pin 3 of the IC. Capacitors C1, C2, and C3 connected between touch input pin 4 and touch plate take out the shock potential from the touch plate, so don’t change these capacitors with a single capacitor or with a capacitor of a lower voltage rating. Mains potential is available in the circuit. Needless to say, it really is high risk to touch the circuit when mains is “on”.
Source

Simple Traffic Light Controller

Here the simple traffic light controller which is could be used to educate kids rudiments of traffic light guidelines. The circuit utilizes easily available electronic parts. It generally consists of rectifier diodes (1N4001), a 5V regulator 7805, two timers circuit using IC 555, two relays (5V, single-changeover), three 15W, 230V light bulbs and also several discrete parts.
Mains electrical power is stepped down by transformer X1 to provide a secondary output voltage of 9V, 300 mA – AC. Then the transformer output current is rectified by a full-wave bridge rectifier composed of diodes D1 through D4, filtered by capacitor C1 and also regulated by IC 7805 (IC1).

IC2 is wired as a multivibrator with ‘on’ and ‘off’ periods of about 30 seconds each with the part values determined. Once mains power switch is turned on, pin 3 of IC2 goes high for 30 seconds. This, in turn, energises relay RL1 via transistor T1 and the red bulb (B1) glows through its normally-open (N/O) contact. At the same time, mains power is turned off from the pole of relay RL2.
As the ‘on’ time of IC2 ends, a triggers IC3 through C5. IC3 is set up as a monostable with ‘on’ time of about 4 seconds, which indicates pin 3 of IC3 will stay high for this period of time and energise relay RL2 through driver transistor T2. The amber bulb (B2) thus lightings up for 4 seconds.
Immediately after 4-second time period of timer IC3 at pin 3 lapses, relay RL2 de-energises and also the green bulb (B3) lights up for the rest of ‘off’ period of IC2, which is about 26 seconds. The green bulb is turned on through the normally closed (N/C) contacts of relay RL2.
So when mains electrical switch is turned on, red light will light up for 30 seconds, amber for 4 seconds and green for 26 seconds.
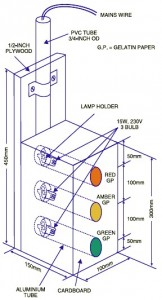
You can easily build this circuit on a general purpose PCB and enclose in a protected box. The box needs to have sufficient area for installing transformer X1 and also two relays. It could be installed near 230V AC, 50Hz power supply or mounted on the PVC tube applied in assembly of the traffic light box.
Design of the traffic light container box is demonstrated in following image:
Simple Traffic Light Controller circuit
A stout cardboard box of 30x15x10cm3 is needed for housing the lights. To make certain durability, work with a 10x45cm2 plywood plate having 1.5 centimeters thickness and also secure onto it three light outlets and the box utilizing nuts and bolts or screws.
Make three tubes of thin aluminium sheet, which is easily offered in equipment stores. The inner diameter of aluminium tubes ought to be such that these can well match on the light outlets. Working with a sharp knife, make holes opposite the outlets carefully. Wire the outlets at the back and take the cables out through the PVC tube.
To begin with, fix three 15W light bulbs (B1 through B3) and then press on the tubes. Support the other ends of the tubes in the holes made on the front panel of cardboard box. Sandwich gelatine papers of the three colors in between two sheets of cardboard and fix over the tubes. The visibility of red, amber and also green lights enhances with their installation on the tubular shape.

Simple Symmetrical Power supply +25v -25v

This symmetrical unregulated power supply is used to feed the audio amplifier based on LM1875 amplifier module National Semiconductor. With symmetrical 30V DC source the amplifier capable of delivering up to 30W of power using 8 ohm load. The diagram above shows how the DC +25 V and-25V DC can be obtained. Ready to provide power to two stereo amplifiers, one 80VA transformer with 240V input and 36V output, with the center tap is used. The output of the transformer secondary repaired using four 1N5401 diodes and filtered through four electrolytic capacitors. A fuse and a varistor connected to the main circuit protection against voltage spikes.
Source

Touch switch electronic circuit based on a Schmitt trigger


This touch switch electronic circuit is based on a Schmitt trigger with latching, built IC1a, IC1b and R3. IC1b's output signal comes back to IC1a input through R3, resulting in maintaining stable condition of both gates. While the circuit is at rest, the anode of D1 is at "0" and the cathode of D2 is at level "1" retain their status.
When contact is shorted by finger touch, the voltage drop across R8 increases. This increase is translated into a short pulse of R1-C1. This pulse transmit through D1 a “ 1” at input of ICla. IC1b's output and output will also go to "1".
When C2 is charged circuit is ready to change the status of the next stimulus appeared on R1. This momentum will make it output IC1a become "0", in which the output of IC1b becomes “ 0 “ C2 voltage decreases. Output is again,, 0 "circuit again is at the point from which it started.

Source

100W inverter 12V to 220V


To lower or raise any specific voltage is better adapted from a transformer, but this component does not operate in direct current, which is available in battery or vehicle. Therefore we must put an oscillator that generates an alternative current.
The Integrated circuit (CD4047) is an oscillator that has the output inversely to one another. This means that while if one is high, other states are low and vice versa. The signals are too weak to drive the transformer so that the driver applied consists from three transistors in the chain. Diode in parallel with the end of each transistor prevent reverse current produced by removing the coil current that can burn the transistor. 5A diode placed in parallel with the power line creates a short circuit when the polarity is accidentally reversed, causing the fuse to skip. The 50K preset adjusts the oscillator frequency, which is directly proportional to the frequency of the AC produced in the transformer.  In order for to work stable the oscillator is provided a 220 Ω current-limiting resistor and Zener 9.1V with a filter capacitor.
Common transformer is used to make a lower voltage, but in this circuit will be used inversely (step up). The resulting transformer calculation here is 220v and v 9.3+9.3V, but finding a suitable transformer which sold in stores is difficult, so here which commonly used voltage 9V+ 9V. With this voltage the capacity should be at 100VA.
This 100W inverter circuit need power supply : V max: simple 12V DC, I max: 10A
100W Inverter Calibration: Simply power the system and put a frequency counter or oscilloscope at the output of the transformer. Turn the preset of 50 kΩ located at 4047 until the measured frequency is 50Hz. After this the calibration is complete.
IMPORTANT:
This 100W inverter equipment generates alternating current whose waveform is square. This is because the transistors are arranged in cut / saturation. There is no problem for this inverter to supply resistive equipment such as welders, light or source. But for TV set or video recorder which is used as the reference frequency and wavelength of the network may not be working correctly.

Surround Sound Decoder


Parts List:
R1-2-7-8-12-13-18-19-20=47Kohm
R3-4-5-6-21-22-34-35=10Kohm
R9-10-11-14-15-16-17=15Kohm
R=23-24-25-33-36=100ohm
R26-27-28-31-32=100Kohm
R29-30=5.6Kohm
C1-8=47uF 25V
C2-7-9-14-23=47nF 100V
C3-6=1uF 100V
C4-5-10=33pF 100V
C11-12-15=10uF 25V
C13=82nF
C16=18pF 100V
C17=100pF mini adjustable capacitor
C18=2.2nF
C19=4.7uF 25V
C20=100nF 100V
C21=10nF
C22=180pF
C24=150nF
RV1-RV2=2X10Kohm  Log. pot.
RV3-4=10K Log pot.
D1=1N4148
IC1-6=TL072
IC2-3=TL074
IC4=MN3101
IC5=MN3004
JI…..J6=RCA female  jack
How the circuit works:
The circuit’s operation starts as the stereo sound signal transports surround sound information on the master volume part of the circuit. This will drive the Left channel Lch attached to Model TL072 IC1A and IC1b in which Right channel Rch is attached. The outputs on these operational amplifiers would serve as the input buffer to the following stages of the circuit. IC2C is responsible for summing up the signals from the left and right channels that will power the central loudspeaker output while IC2D is responsible for increasing the phase difference between left and right channels which is encoded in the two channels and will be fed to the rear loudspeakers. It is necessary to ensure that the negative terminals between the rear speaker is not earthed because they will simply function in parallel with the main speakers.
The output of IC2D will power regulated delay unit of audio to the rear loudspeakers. This would lead to the creation of proper sense of spacing in accordance to the size of the room. This will incorporate op-amp sound delay signal IC5 MN3004 which has 512 stages. Since IC4 MN3101 is a clocking signal, it provides timing to IC5 as it functions as an oscillator in the circuit. Variable capacitor C17 regulates the delay time in the circuit. The presence of filters in the circuit is for the purpose of preventing noise that will be produced during the process. These filters can be regulated to cut the frequencies above 8 KHz and under 100 Hz, to be able to drive the rear speaker. The rear loudspeaker is small in size because its input is encoded with a bandwidth of 100 Hz up to 8 KHz. The filters are built around the IC6A/B which is also an output buffer. A potentiometer is placed in every output to aid in the adjustment and regulation of loudspeakers and amplifiers. The supplied power in the circuit is 15 V and every output can drive a single power amplifier.
http://circuitdiagram.net/

Power Amplifier 14W Class A


This class A amplifier circuit requires a preamp as it hasn’t got much gain. It requires big heat sinks and a large transformer and a great power supply and careful wiring, but in the end it is extremely simple and it sounds very good. The zener diode rejects any ripple coming from the power supply, But you still only want a ripple of 10mV max. The ripple reaching the input is amplified, so the zener gets rid of that, but whatever ripple there is will still reach the power stage.
Many early amplifiers operated in Class A, but as output powers rose above 10W the problems of heat dissipation and power supply design caused most manufacturers to turn to the simpler, more efficient Class B arrangements and to put up with the resulting drop in perceived output quality. Why Class A ? Because , when biased to class A, the transistors are always turned on, always ready to respond instantaneously to an input signal. Class B and Class AB output stages require a microsecond or more to turn on. The Class A operation permits cleaner operation under the high-current slewing conditions that occur when transient audio signal are fed difficult loads. His amplifier is basically simple, as can be seen from the block diagram.